

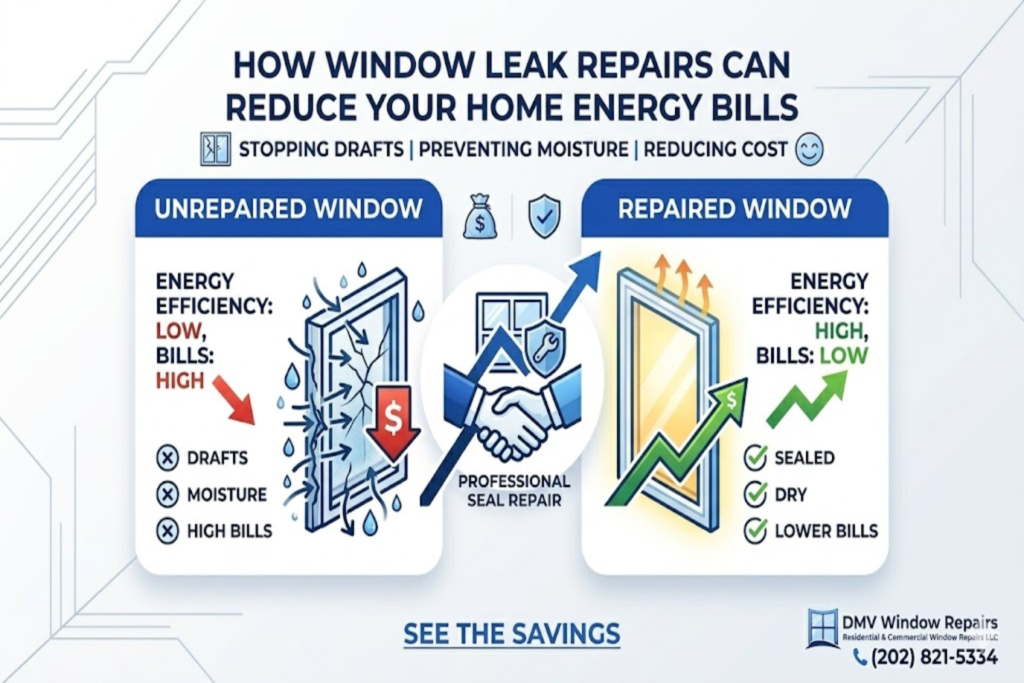
Window weatherproofing delivers one of the highest returns on investment among all home improvement projects because it directly stops energy loss at the source — the numerous small gaps cracks and worn seals present in almost every window installation. These seemingly minor openings allow heated or cooled air to escape continuously while pulling in outdoor drafts humidity pollen dust and street noise. When properly addressed the home experiences dramatically more stable indoor temperatures reduced strain on HVAC equipment noticeably lower monthly utility bills and enhanced overall comfort for every family member.
Rooms feel warmer in winter without cold drafts blowing across floors cooler in summer without hot sun pouring through glass and significantly quieter regardless of outside traffic or weather conditions. Beyond comfort and savings weatherproofing protects interior surfaces from sun fading prevents moisture damage that leads to mold rot and peeling paint and extends the functional life of window frames sills and hardware.
The methods work equally well on new modern windows older single-pane units double-hung sliding casement bay bow and even specialty shapes. With affordable materials basic tools and straightforward techniques most homeowners complete effective projects over a weekend achieving results that rival professional installations while building valuable DIY skills for future home maintenance tasks.
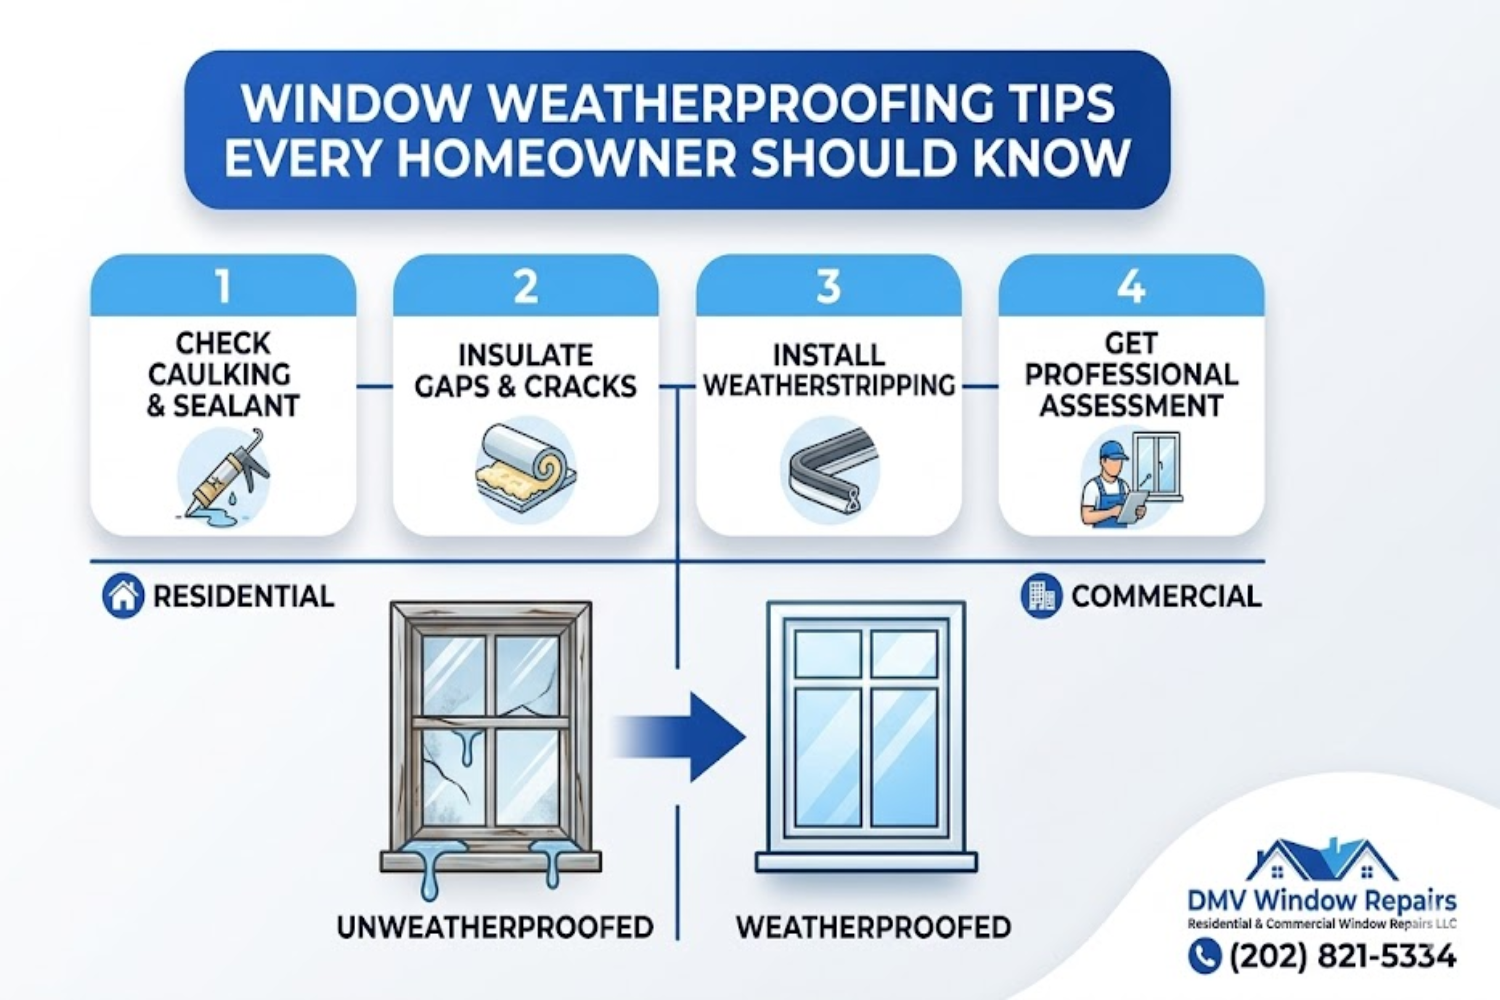
Understanding the Basics of Window Weatherproofing
Window weatherproofing builds an airtight thermal barrier by sealing every potential leakage point around and within the window assembly itself. Critical zones include the exterior perimeter where frame meets exterior siding brick or stucco the interior stops and jambs where sashes meet the frame and all compression points where moving parts contact each other during normal operation.
Over time these joints naturally develop gaps due to wood shrinkage paint failure caulk deterioration weatherstripping compression settling foundation movement and repeated thermal expansion and contraction cycles. Targeted repairs restore lost performance without requiring expensive full-frame replacements or major structural disruption. Homeowners immediately notice steadier thermostat readings shorter equipment run times cleaner air with less outdoor particulate entry and reduced external noise penetration making daily living more pleasant and peaceful.
Fundamental Concepts Every Homeowner Needs
Successful weatherproofing relies on three core rules: achieve 100% continuous coverage use materials compatible with frame type and climate and build in redundancy through layered protection. Every air pathway — fixed joints operable edges corners miter joints hardware holes weep holes and installation shims — must receive attention.
Sealants require flexibility to move with the building without cracking while maintaining tenacious adhesion through ultraviolet exposure freeze-thaw cycles high winds and heavy rain. Combining exterior-grade caulk with interior compression weatherstripping plus optional films or inserts creates multiple defensive lines greatly outperforming any single-method approach and delivering near-professional energy performance improvements.
Proven Energy Savings and Daily Comfort Gains
Thorough window weatherproofing commonly reduces annual heating plus cooling costs by 20% to 45% especially in homes built before 2000 or those still using single-pane glass poorly sealed double-pane units or deteriorated original weatherstripping. The tighter building envelope retains desired indoor temperatures longer allowing furnaces boilers and air conditioners to cycle less frequently and run at lower capacity when active.
Occupants feel immediate relief from drafts cold window surfaces hot solar gain and uneven room temperatures. External noise drops markedly improving sleep concentration television clarity and conversation quality particularly in bedrooms living rooms and home offices facing streets driveways or busy areas. Indoor air stays cleaner with far less pollen dust mold spores and vehicle exhaust entering through unsealed gaps supporting better respiratory health for allergy sufferers and families with young children or elderly members.
Identifying Common Window Weatherproofing Problems
Proactive identification of failing seals drafts and moisture issues prevents minor problems from growing into expensive structural damage higher energy waste mold outbreaks and compromised indoor air quality. Schedule quick inspections during spring and fall when temperature contrasts highlight issues most clearly and during or immediately after heavy wind rain or snow events. Look feel listen and test methodically focusing on visible wear unusual odors operational difficulty and temperature anomalies near windows. Early intervention keeps repairs simple inexpensive and highly effective while preserving window function aesthetics and long-term performance.
Proven Ways to Locate Drafts and Air Leaks
- Hold a lit incense stick candle lighter or thin tissue strip near all window edges jambs sills meeting rails and frame-to-wall joints on a windy day watching for smoke deflection flame flicker or tissue flutter that pinpoints active infiltration.
- Run your hand slowly around the complete perimeter feeling distinct cold currents especially strong at lower corners upper sash rails and hardware locations.
- Listen for high-pitched whistling whooshing or low humming during gusty conditions another reliable sign of significant gaps.
- Perform an exterior water test using a garden hose on low pressure while someone monitors interior sills for drips stains fogging or pooling.
- Affordable thermal leak detectors smartphone FLIR attachments or basic infrared thermometers reveal cold zones visually even on moderately cool days helping target repairs precisely.
Identifying Condensation Moisture and Mold Early
Interior glass or frame condensation almost always indicates failed insulated glass unit seals or inadequate interior weatherproofing allowing warm humid household air to reach cold surfaces. Exterior condensation water stains bubbling peeling paint or efflorescence on masonry near windows signals broken exterior caulking or improper flashing letting rainwater penetrate. Persistent musty odors visible dark spotting powdery white residue or soft spongy wood around sills jambs or trim confirm active mold or mildew fueled by recurring dampness. Increase ventilation use dehumidifiers replace compromised seals dry thoroughly and treat affected areas with EPA-approved mold cleaners or vinegar solutions. Stopping moisture cycles early protects window components surrounding drywall plaster insulation and structural framing from progressive deterioration.
Must-Have Tools and Materials for Window Weatherproofing
Assembling the right tools and selecting premium compatible materials before starting any weatherproofing project eliminates frustrating interruptions ensures strong lasting bonds and produces clean professional-grade results that endure multiple seasons. Focus on exterior-rated products designed for wide temperature ranges UV resistance flexibility and adhesion to common frame materials including wood vinyl aluminum fiberglass and clad exteriors. Quality supplies cost only slightly more upfront yet deliver dramatically longer service life fewer reapplications and better overall energy performance.
| Tool / Material | Primary Function | Typical Price Range | Key Features / Recommendations |
| Professional Caulk Gun – Drip-Free Ratchet Style | Smooth consistent controlled application of sealant | $15 – $35 | Minimum 10:1 thrust ratio rotating barrel for tight corners |
| Premium 100% Silicone Exterior Caulk – Clear | Permanent flexible watertight UV-resistant seal for all exterior joints | $8 – $16 per tube | +/-50% joint movement mildew resistant 40-year warranty typical |
| Advanced Polymer / Hybrid Sealant – Paintable | Flexible long-life seal paintable within 30 minutes suitable for wood and clad frames | $9 – $18 per tube | Excellent adhesion low odor +/-50% movement 50+ year lifespan |
| Utility Knife – Quick-Change Retractable | Precise cutting of tape old caulk weatherstripping and shrink film | $8 – $20 | Metal body 5–10 spare heavy-duty blades included |
| 5-in-1 Painter’s Multi-Tool – Stainless Steel | Efficient removal of old caulk paint chips dried adhesive and loose debris | $6 – $14 | Flexible blade curved scraper nail setter |
| Blue Painter’s Tape – 14–21 Day Clean Removal | Creates razor-sharp caulk lines protects glass siding and interior trim | $5 – $12 per roll | UV resistant medium adhesion no residue after 21 days |
| 25 ft Wide-Blade Measuring Tape | Accurate solo measuring of long strips film pieces and irregular openings | $10 – $22 | 1-1/4″ blade stands rigid nylon-coated for durability |
| 9″ Magnetic Bubble Level | Ensures perfectly straight weatherstripping alignment and storm window mounting | $8 – $18 | V-groove magnetic base strong rare-earth magnets |
| Caulk Finishing Tool / Plastic Spoon Set | Smooths fresh caulk into concave weather-shedding profile | $4 – $10 | Multiple radii sizes reusable dishwasher-safe plastic |
| Closed-Cell Foam Tape – 3/8″ × 1/4″ Self-Adhesive | Compresses to seal small-to-medium consistent gaps around operable sashes | $10 – $25 per roll | Weather-resistant 5–8 year life black or grey to match frames |
| Bronze V-Strip Tension Weatherstripping | Extremely durable invisible seal for double-hung horizontal sliding windows | $12 – $30 per pack | Interlocking design lifetime potential on low-traffic windows |
| EPDM Tubular Rubber Gasket – Self-Adhesive | High-recovery compression seal for casement awning and frequently operated units | $15 – $35 per pack | -40°F to 250°F range excellent UV ozone resistance |
| Clear Window Shrink-Film Insulation Kit – Large | Fast inexpensive temporary full-window insulating air barrier | $12 – $30 per kit | Double-thick film heavy-duty tape hair dryer activation crystal clear |
| Magnetic Acrylic Secondary Glazing Panels | Removable rigid insert superior insulation noise reduction easy seasonal removal | $50 – $150 per window | 1/8″–1/4″ thickness custom-cut or standard sizes magnetic tape system |
| J-Roller / Weatherstrip Pressure Roller | Eliminates air bubbles ensures 100% adhesive contact for maximum bond strength | $8 – $20 | Wide rubber wheel ball-bearing handle non-marring surface |
| Denatured Alcohol – Surface Prep Cleaner | Removes oils silicone residue fingerprints grease and contaminants before sealing | $7 – $15 per quart | Fast evaporation residue-free critical for reliable long-term adhesion |
Professional vs DIY Weatherproofing Approaches
Professional contractors bring years of field experience specialized equipment commercial-grade materials and trained eyes that catch subtle frame damage rot insect activity or installation flaws often missed during DIY evaluations. They complete whole-house projects efficiently offer performance guarantees labor warranties and sometimes utility rebate coordination or before-after blower-door testing to document actual air-sealing improvements.
DIY weatherproofing dramatically lowers costs provides total control over product selection timing and quality allows learning valuable maintenance skills and suits most standard tasks perfectly — caulking weatherstripping film application basic storm panel mounting and minor hardware adjustments. Many homeowners in Woodbridge VA successfully combine approaches hiring professionals for structural repairs complex historic windows or complete exterior envelope upgrades while confidently performing routine seasonal sealing stripping and film installations themselves year after year.
Conclusion
Window weatherproofing stands out as one of the most intelligent practical and immediately rewarding home improvement investments available today combining very modest material and tool costs quick application times substantial ongoing energy bill reductions enhanced everyday comfort noticeably quieter interiors cleaner indoor air and significantly extended window and frame lifespan.
The proven techniques covered in this guide — thorough surface preparation premium exterior caulking durable weatherstripping shrink films rigid insulating inserts and supplemental storm windows — when executed carefully and maintained consistently transform previously drafty energy-inefficient homes into tightly sealed high-performing residences that handle extreme summer heat bitter winter cold heavy rain high winds and seasonal transitions with ease.
Start small by tackling the leakiest most uncomfortable windows first using quality products and proper methods then gradually expand to the rest of the house building expertise confidence and cumulative savings along the way. The financial payback typically arrives within one to two seasons while the comfort health noise-reduction and property-value benefits continue delivering value for many years afterward making window weatherproofing an essential proactive step every responsible homeowner should prioritize.
Frequently Asked Questions (FAQs)
How long should high-quality window weatherproofing materials actually last under normal conditions?
Premium exterior silicone or hybrid caulks typically maintain effective seals for 8–15 years while top-grade weatherstripping (EPDM rubber bronze V-strip closed-cell foam) often performs reliably for 7–12 years depending on direct sun exposure rain frequency freeze-thaw cycles and window usage. Annual visual inspections catching early cracking peeling hardening or loss of compression allow timely touch-ups that extend overall system life significantly beyond manufacturer minimum ratings.
Can an average homeowner successfully weatherproof windows entirely without professional help?
Yes the vast majority of standard weatherproofing tasks — surface cleaning old material removal caulking weatherstripping application shrink-film installation and basic storm panel mounting — fall comfortably within reach of most homeowners using only basic hand tools clear step-by-step guides manufacturer instructions and a little patience. Start with less visible or lower-story windows to practice technique then progress to more prominent areas for excellent DIY results that rival many professional jobs at a fraction of the labor cost.
Will weatherproofing materials change damage or make my windows look unattractive?
Modern high-quality materials — clear shrink films invisible V-strip neutral-colored foam tape paintable hybrid caulks and properly tooled clear silicone beads — remain virtually undetectable once installed correctly. Professional application techniques produce clean straight lines smooth concave profiles and seamless blending with existing frame trim and siding colors. Most homeowners report that freshly sealed windows actually improve appearance by removing dirt stains old peeling caulk and weathered discoloration.
What realistic percentage reduction in heating and cooling bills can I expect after comprehensive weatherproofing?
Average households achieve 20–45% savings on combined heating plus cooling costs depending on starting window condition (single-pane vs double-pane age of seals) local climate severity extent of sealing work completed and current utility rates. Older homes with single glazing or severely deteriorated weatherstripping frequently see results at the higher end of that range with payback periods often under 18 months.
Which single weatherproofing method provides the biggest energy savings for the lowest upfront cost?
Exterior-grade caulking of all perimeter joints combined with fresh adhesive-backed weatherstripping on operable sash edges consistently delivers the highest return on investment — typically under $100–$150 in materials for an average home yet producing immediate noticeable draft reduction and energy savings. Adding interior shrink-film kits on the worst-performing windows boosts gains further for minimal extra expense and effort.
What is the ideal time of year to perform window weatherproofing work for best results?
Spring (April–June) and early fall (September–November) offer moderate temperatures (50–80°F) ideal for proper caulk flow adhesion curing and comfortable working conditions without rain heat or freezing interruptions. Avoid application when surfaces are below 40°F or above 90°F when rain is forecast within 24–48 hours or during periods of high humidity that slow drying and curing.
Does weatherproofing older single-pane windows make a noticeable difference or should I just replace them?
Weatherproofing older single-pane windows delivers very significant improvements — often 25–40% energy savings reduced drafts condensation and noise — at a tiny fraction of replacement cost. While new ENERGY STAR double or triple-pane windows provide superior long-term performance caulking stripping films and storm panels can bring single-pane units surprisingly close to modern efficiency levels making weatherproofing an excellent first step or permanent solution for budget-conscious homeowners.
Can I paint over caulk and weatherstripping after installation without ruining the seal?
Yes most premium exterior hybrid polymer caulks and many silicone formulations are specifically designed to accept paint usually within 30 minutes to 2 hours after tooling. Standard adhesive-backed foam tape and V-strip weatherstripping can also be painted if desired though many homeowners leave them natural since they sit in protected channels. Always test a small hidden area first and use high-quality exterior paint formulated for flexibility.
Will adding window films or inserts cause any damage to my existing windows over time?
When applied correctly to clean dry glass using manufacturer-recommended tape or magnetic systems shrink films and rigid acrylic/polycarbonate inserts cause no damage and are fully removable without residue or scratching. They actually help protect original glass from UV fading reduce thermal stress on frames and minimize interior condensation issues. Avoid low-quality films that use acidic adhesives or improper installation methods that trap moisture.
How do I know if my current insulated glass windows have failed seals and need weatherproofing attention?
The most common signs of failed insulated glass unit (IGU) seals include persistent fogging condensation or cloudiness between the two panes (not on interior or exterior surfaces) visible discoloration or etching inside the glass unit and sometimes a noticeable vacuum hiss when pressing near the edge spacer. These units lose their argon/krypton fill and insulating ability but exterior perimeter caulking interior weatherstripping and supplemental films or storm windows can still dramatically improve overall performance until eventual replacement.

