

Patio doors serve as beautiful transitions between indoor living spaces and outdoor areas, flooding rooms with natural light while providing easy access to patios, decks, or gardens. Over time, the glass components face significant stress from weather changes, accidental impacts, thermal expansion, and regular use. Issues like cracks, shattering, fogging between panes, or complete breakage can compromise both aesthetics and functionality. These problems reduce energy efficiency, allow unwanted noise, decrease home security, and sometimes create safety hazards from sharp edges.
Addressing patio door glass damage promptly prevents minor issues from turning into major expenses or structural concerns. Whether choosing DIY methods for simple fixes or professional services for complex insulated units, understanding the repair process helps homeowners make informed decisions. This comprehensive guide explains diagnosis, tools, step-by-step procedures, material choices, costs, maintenance, and professional options in detail. Residents in Woodbridge VA frequently seek these solutions to restore smooth operation and clear views quickly.
Understanding Patio Door Glass Damage
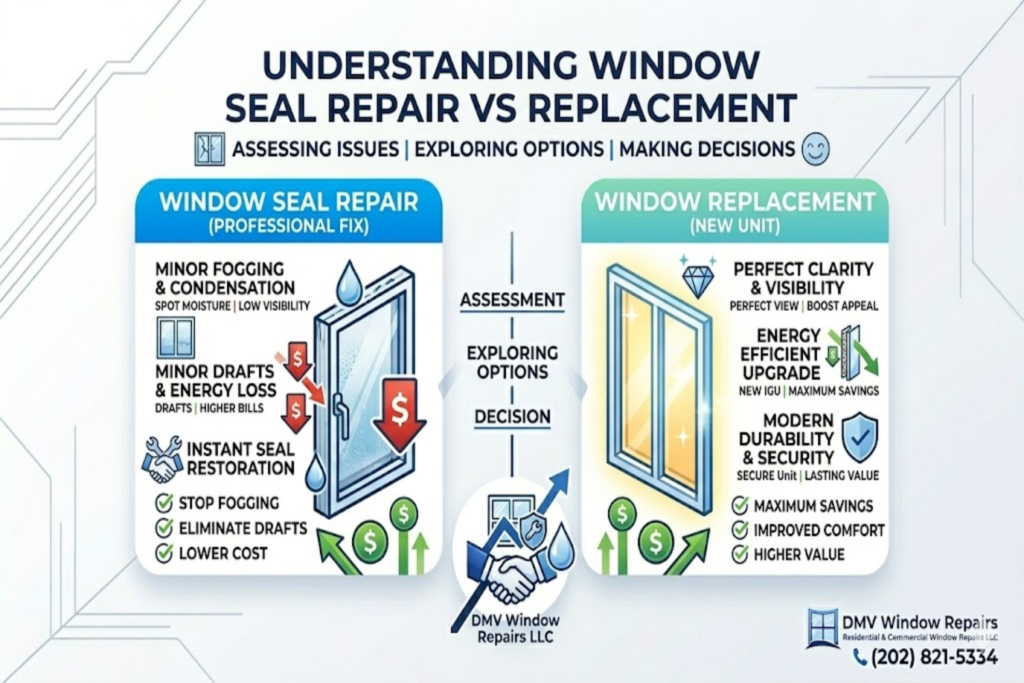
Patio door glass experiences constant environmental exposure combined with mechanical stress from daily sliding action. Early detection of problems allows for cost-effective solutions rather than full replacements. Common indicators include visible fractures, cloudiness inside double-pane units, drafts near edges, condensation patterns, or difficulty operating the door smoothly.
Proper diagnosis distinguishes between repairable surface damage and failures requiring complete unit replacement. Most issues trace back to impact, seal breakdown, frame movement, or manufacturing defects that surface after years of service. Regular visual checks help catch developing problems before they worsen significantly.
Signs of Glass Failure
Cracks radiating from impact points often appear suddenly after storms or objects striking the surface. Fog or moisture trapped between panes indicates a compromised seal that allows air and water infiltration. Difficulty sliding the door smoothly frequently results from glass shifting within the frame or misaligned rollers. Noticeable temperature differences near the door suggest lost insulating properties in multi-pane glass. Unusual reflections, distortion, or haziness point to delamination or internal coating failure. These warning signs should prompt immediate inspection to maintain safety and efficiency.
Common Causes of Damage
Sudden impacts from lawn equipment, sports balls, or falling branches frequently cause chips or shattering. Repeated thermal cycling during extreme summer heat and winter cold stresses glass edges until cracks form. Foundation settling or house movement gradually warps frames, placing uneven pressure on glass panels. Sealant degradation over 10–20 years allows moisture ingress leading to permanent fogging. Improper previous installations or low-quality materials accelerate deterioration significantly. Heavy use combined with inadequate maintenance compounds these environmental and structural factors.
Essential Tools and Materials
Having appropriate tools and quality materials ready prevents frustration and ensures professional-level results even for DIY projects. Basic hand tools handle most removal and installation tasks efficiently. Specialized items improve precision and safety when working with large tempered glass panels. Always purchase slightly more materials than calculated to account for mistakes or unexpected needs. Reliable suppliers offer better durability and better compatibility with modern door systems.
Hand Tools List
Multiple screwdrivers (flathead and Phillips) remove screws securing panels and hardware. Putty knives of various widths help extract old glazing compound without damaging frames. Precision measuring tape and straightedge ensure accurate glass sizing. Glass suction cups (minimum four-cup models) provide secure handling of heavy panels. Utility knives with fresh blades create clean cuts through caulk and seals. Rubber mallets gently tap components into position without cracking new glass.
Safety Gear
Cut-resistant gloves protect hands during glass removal and sharp edge handling. Impact-resistant safety goggles shield eyes from flying fragments and dust. Steel-toe boots guard feet when moving heavy doors or panels. Dust masks prevent inhalation of fine glass particles or old sealant fumes. Long-sleeve shirts reduce skin exposure to potential cuts. Having a first-aid kit nearby addresses minor injuries immediately.
Step-by-Step DIY Glass Repair Guide
- Structured procedures reduce errors and deliver durable results when homeowners possess moderate handyman skills.
- Preparation, careful execution, and thorough testing ensure long-lasting repairs.
- Always work on dry, calm days for best sealant performance.
- Double-check measurements multiple times before ordering replacement glass.
- Patience during curing periods prevents premature failure of new installations.
Step 1: Safety First
Clear surrounding furniture, rugs, and obstacles to create safe working space. Remove pets and children from the area completely. Put on full protective gear before beginning any work. Evaluate the entire door assembly for additional hidden damage. Arrange for a second person to assist with lifting heavy panels. These precautions dramatically reduce accident risks.
Step 2: Removing the Door Panel
Lift the door slightly upward to clear bottom rollers from the track. Tilt the top outward while supporting the full weight securely. Lower the panel carefully onto padded sawhorses or blankets. Remove any remaining screws or clips holding glass in place. Clean exposed roller tracks thoroughly while the door remains removed. Proper removal prevents frame damage during the process.
Step 3: Extracting Old Glass
Score old glazing compound or silicone along all edges using a sharp utility knife. Gently tap from the interior side to loosen shards progressively. Remove pieces starting from the center moving outward systematically. Vacuum all debris immediately to maintain clean working conditions. Strip remaining adhesive or gaskets completely for smooth preparation. Measure the exact opening dimensions at multiple points.
Step 4: Preparing the Frame
Inspect wooden or vinyl frames for rot, warping, or water damage thoroughly. Repair any compromised sections before proceeding further. Apply fresh butyl glazing tape or silicone sealant around the perimeter evenly. Clean all contact surfaces with isopropyl alcohol for maximum adhesion. Verify roller alignment and track condition at this stage. Test-fit replacement glass without final securing to confirm measurements.
Step 5: Installing New Glass
Position new pane using suction cups for controlled placement and alignment. Insert setting blocks at bottom edges to support weight properly. Secure glass with glazing points, push-in clips, or vinyl stops according to door design. Apply exterior-grade silicone caulk smoothly along all edges. Reinstall panel into frame and adjust rollers for smooth operation. Clean both interior and exterior surfaces thoroughly after completion.
Professional Repair Options
Experienced technicians possess specialized equipment, factory-approved materials, and extensive knowledge of various door brands. They complete complex double-pane or triple-pane replacements efficiently with minimal disruption. Professional services typically include warranties covering both parts and labor. Emergency response options handle broken glass situations quickly. Certified installers ensure compliance with local building codes and energy standards. In Woodbridge VA, homeowners often choose professional services for reliable, long-lasting results on larger or insulated glass units.
Types of Glass for Patio Doors
Modern glass options dramatically improve performance beyond basic clear panels. Upgrading during repairs provides opportunities to enhance energy efficiency, security, and comfort simultaneously. Understanding available choices helps match glass to specific needs and climate conditions. Tempered safety glass remains standard for most residential applications. Advanced coatings and laminates offer additional benefits worth considering.
Single vs Multi-Pane Glass
Single-pane glass provides basic visibility at lowest cost but offers minimal insulation value. Double-pane units with argon-filled space significantly reduce heat transfer and noise transmission. Triple-pane configurations deliver maximum energy efficiency in colder regions though heavier and more expensive. Multi-pane designs resist condensation far better than single layers. Upgrading from single to double-pane typically recovers costs through lower utility bills within several years.
Specialized Glass Features
Tempered glass breaks into small, rounded pieces instead of dangerous sharp shards. Low-E coatings reflect heat while transmitting visible light effectively. Tinted or frosted glass increases privacy without blocking natural illumination completely. Laminated glass adds burglary resistance and sound dampening properties. Self-cleaning photocatalytic coatings reduce exterior maintenance requirements noticeably. Combining multiple features creates high-performance patio doors.
Cost Analysis and Budgeting
Repair costs depend heavily on glass type, damage severity, door size, whether choosing DIY or professional service, location factors, and current market rates. Simple fixes remain affordable while complete insulated unit replacements reach higher price ranges. Understanding typical pricing ranges helps set realistic expectations and avoid surprises. Obtaining multiple quotes reveals competitive options in most markets. Including potential additional expenses like disposal, custom sizing, or emergency fees prevents budget overruns. Prices have seen slight increases in recent years due to material and labor trends.
| Repair Type | Description | Average DIY Cost | Average Professional Cost | Typical Time Required | Notes on Factors Affecting Price |
| Basic Scratch or Chip Repair | Polishing or filling minor surface damage | $30–$100 | $100–$300 | 1–2 hours | Depends on depth and location of damage |
| Track Cleaning & Lubrication | Removing debris and applying lubricant | $20–$80 | $100–$250 | 30–90 minutes | Often prevents bigger issues if done regularly |
| Roller Replacement | Swapping worn or broken bottom rollers | $50–$150 | $150–$400 | 1–3 hours | Includes alignment adjustments |
| Lock/Handle Repair or Replacement | Fixing faulty locks, handles, or mechanisms | $40–$120 | $100–$300 | 1–2 hours | Security-related, may need matching hardware |
| Weatherstripping/Seal Replacement | Replacing worn seals to stop drafts | $30–$100 | $75–$200 | 1–3 hours | Improves energy efficiency noticeably |
| Single-Pane Glass Replacement | Replacing one basic tempered glass panel | $150–$450 | $300–$800 | 3–6 hours | Common for older doors |
| Double-Pane Insulated Unit Replacement | Replacing fogged or broken sealed unit | $400–$900 | $700–$1,500 | 5–10 hours | Includes argon fill and low-E options |
| Triple-Pane Upgrade Replacement | Installing advanced high-efficiency unit | $700–$1,400 | $1,200–$2,500 | 1–2 days | Best for extreme climates |
| Frame Repair or Adjustment | Fixing warped, rotted, or misaligned frames | $200–$600 | $400–$1,200 | 4–12 hours | Often combined with glass work |
| Full Door System Repair/Replacement | Comprehensive fix or new door installation | $800–$2,500 | $1,800–$5,000+ | 1–3 days | When multiple components fail |
| Emergency Broken Glass Board-Up | Temporary secure covering after breakage | N/A | $150–$400 | 1–2 hours | Immediate safety service |
| Custom Glass Features Addition | Adding tint, laminate, impact-resistant | +$200–$800 | +$400–$1,500 | Extra 2–6 hours | Enhances security/privacy/energy |
| Condensation Removal (Non-Fogged) | Cleaning internal moisture if seal intact | $50–$150 | $200–$500 | 2–4 hours | Rare; only if moisture not from seal failure |
| Hardware Upgrade (Rollers + Tracks) | Modernizing movement system | $100–$300 | $300–$700 | 2–5 hours | Improves long-term sliding performance |
| Glass Polishing for Scratches | Surface-level scratch removal | $40–$120 | $150–$350 | 1–3 hours | Effective only for light scratches |
Conclusion
Patio door glass repairs restore both beauty and performance while protecting your home’s energy efficiency, security, and comfort. Whether handling minor chips yourself or calling professionals for double-pane replacements, timely action prevents small problems from becoming expensive disasters. Investing in quality materials, following proper procedures, and maintaining the door regularly extends its life significantly.
Upgrading to modern glass features during repairs often delivers excellent long-term value through lower utility bills and improved safety. With the right knowledge and approach, most homeowners can achieve professional-quality results and enjoy clear, smooth-operating patio doors for many years.
Frequently Asked Questions
- How long does a typical patio door glass repair take to complete?
Minor chip repairs or track adjustments usually finish within 1–3 hours. Full single-pane replacement generally requires 3–6 hours including preparation and testing. Double-pane insulated unit replacements often take 6–10 hours depending on door size and complexity. Professional teams complete most jobs in one visit while DIY projects may extend over several days. Proper curing time for sealants should be observed before heavy usage.
- Can foggy double-pane patio door glass be repaired without replacement?
Unfortunately, internal fogging results from permanent seal failure, making DIY drying ineffective long-term. Temporary fixes like drilling drain holes provide only short-term relief at best. Complete replacement of the insulated glass unit becomes necessary for clear, efficient performance restoration. Professional replacement ensures argon retention and proper edge sealing.
- What safety measures are most important when handling patio door glass?
Always wear thick cut-resistant gloves and impact-rated safety glasses throughout the entire process. Use proper suction cup lifters rated for the panel weight being handled. Work with at least one helper when moving large or heavy glass sections. Keep the work area clear of children, pets, and unnecessary obstacles. Dispose of broken glass in puncture-resistant containers immediately.
- Is it more economical to repair glass or replace the entire patio door?
When frames, rollers, and weatherstripping remain in good condition, glass-only replacement saves substantial money compared to full door systems. Complete replacement becomes preferable only when widespread frame damage, outdated design, or multiple component failures exist. Professional evaluation helps determine the most cost-effective solution for each specific situation.
- How do I choose the right glass thickness for replacement?
Most standard patio doors use 1/8-inch or 3/16-inch tempered glass for single-pane applications. Double-pane units typically feature 1/8-inch exterior and interior lites with 1/2-inch to 5/8-inch overall thickness including airspace. Always measure existing glass precisely or consult manufacturer specifications. Using incorrect thickness can cause poor fit, operation issues, or seal failure.
- Does replacing patio door glass improve energy efficiency noticeably?
Upgrading from single-pane to double or triple-pane with low-E coating and argon fill dramatically reduces heat loss and gain. Many homeowners report 15–30% improvement in energy performance near the door area after upgrade. Low-E glass blocks harmful UV rays while maintaining excellent visible light transmission. These improvements lower heating and cooling costs year-round.
- How often should I perform maintenance on patio door glass and tracks?
Quick monthly inspections catch developing problems early while deep cleaning and lubrication should occur at least twice yearly. Check seals, rollers, and alignment during spring and fall ideally. Address any unusual noise, sticking, or visible wear immediately upon discovery. Consistent attention prevents most emergency repair situations.
- What causes the most common patio door glass breakage patterns?
Impact from objects like rocks, balls, or lawn equipment typically creates starburst or radial crack patterns. Thermal stress from rapid temperature changes often produces straight-line cracks near edges. Pressure from frame warping or settling usually results in corner-to-corner diagonal fractures. Understanding breakage patterns helps identify underlying causes beyond obvious impact.
- Can I install impact-resistant or security glass in existing patio doors?
Yes, laminated impact-resistant glass fits most standard patio door frames during replacement. These products significantly increase resistance to forced entry and severe weather impacts. Many insurance providers offer premium discounts for impact-rated glass installations. Professional measurement ensures proper fit and weatherproof performance.
- How do I know when patio door glass needs professional attention instead of DIY?
Large panels, double/triple-pane units, tempered glass requiring special cutting, or situations involving electrical components warrant professional service. Any doubt about structural integrity, proper sealing, or code compliance justifies expert involvement. When safety concerns exist or warranty preservation matters, professional repair provides best results. In Woodbridge VA, certified technicians handle these specialized situations efficiently.
Visit our DMV Window Repairs LLC blog to explore our residential and commercial glass services for customers in Woodbridge, VA.


