

Drafty windows create persistent discomfort by permitting uncontrolled air movement that disrupts indoor temperature stability year-round. Cold drafts in winter make rooms feel chilly even with the heating system running steadily, while summer drafts allow hot, humid air to enter and force air conditioners to compensate excessively. These leaks contribute significantly to energy waste, as conditioned air escapes continuously while outdoor temperatures infiltrate freely. The U.S. Department of Energy estimates that air leaks, including those around windows, can account for 10–20% of total home heating and cooling energy consumption in many residences.
Diagnosing drafts accurately identifies exact sources—whether worn weatherstripping, cracked perimeter caulk, misaligned sashes, failed insulated glass seals, or gaps at hardware points—so repairs target problems effectively. Proper diagnosis prevents unnecessary full window replacements by distinguishing minor fixable issues from more serious seal failures. Systematic testing builds confidence that all major pathways receive attention. In places experiencing notable seasonal shifts like Woodbridge VA, thorough draft diagnosis often reveals opportunities for substantial comfort gains and utility cost reductions.
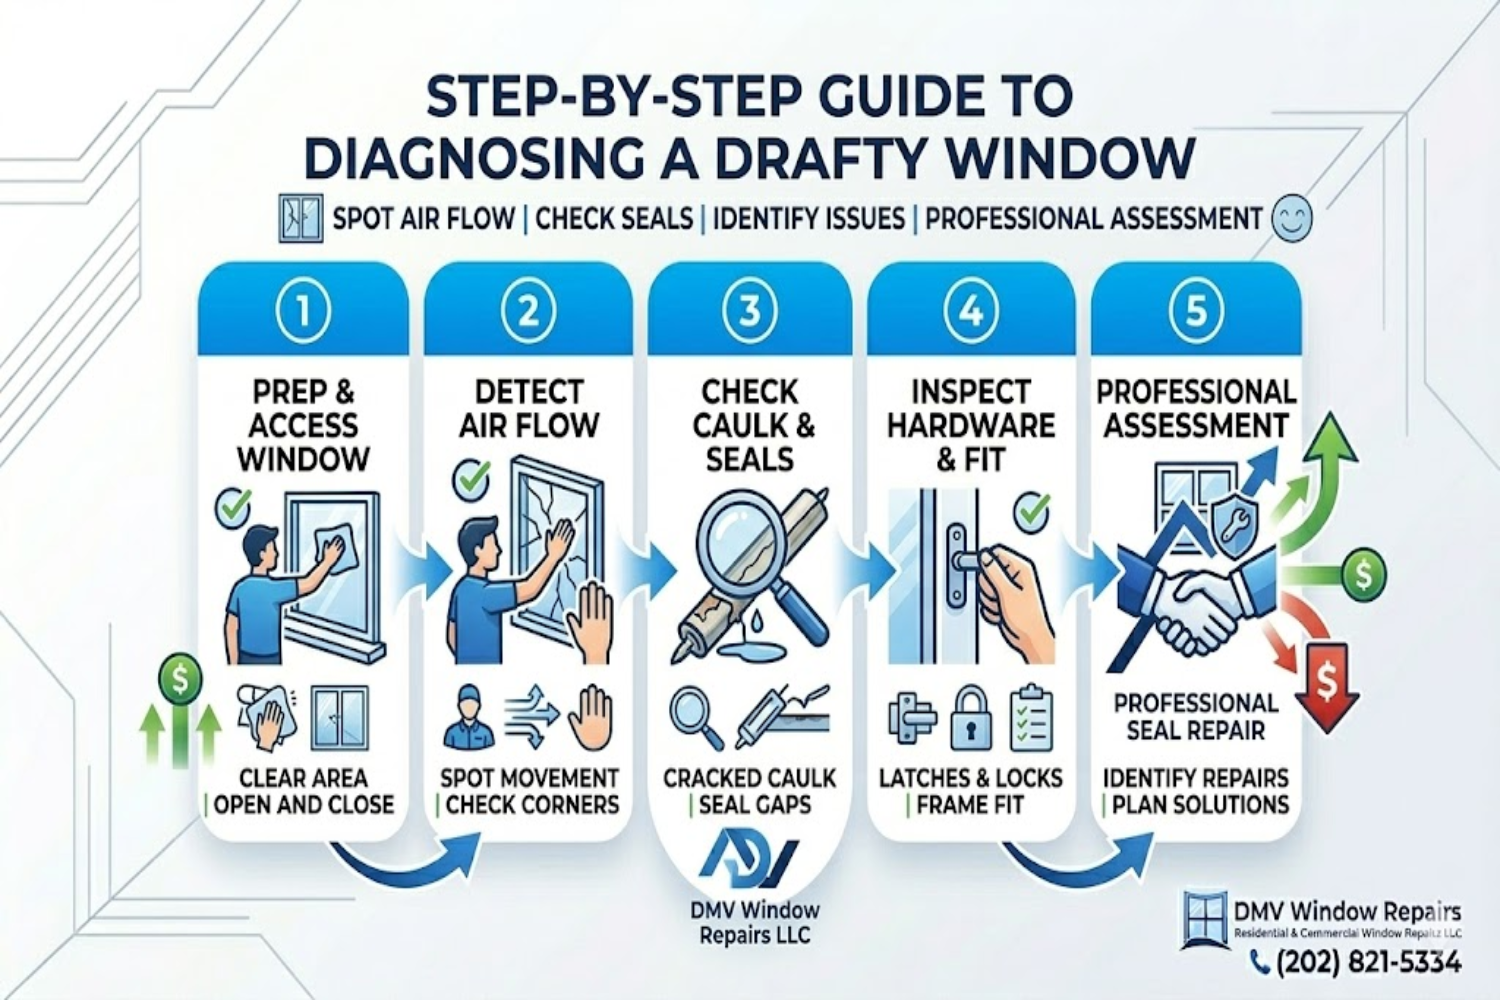
Why Drafty Windows Develop and How They Impact Your Home

Over years, windows accumulate wear from thermal cycling that causes frames and sashes to expand and contract unevenly. UV radiation degrades rubber weatherstripping into brittle, ineffective strips. Exterior caulk shrinks and cracks from repeated freeze-thaw cycles and sun exposure. House settling subtly shifts frames, opening new gaps at joints. Physical impacts or poor initial installation compound these natural processes.
Drafts force HVAC systems to run longer, increasing wear and energy use noticeably. Uneven temperatures create cold spots that make occupants uncomfortable and prompt higher thermostat settings. Dust and pollen enter more readily, worsening indoor air quality and allergy symptoms. Untreated drafts accelerate frame deterioration through repeated moisture condensation.
Essential Preparation Steps Before Any Draft Testing
Select a day with strong wind or a temperature difference of at least 20–30°F between indoors and outdoors for maximum pressure differential and clearer results. Close all exterior doors and operable windows throughout the house to isolate airflow. Turn off ceiling fans, exhaust fans, and HVAC blowers to eliminate competing air movement.
Gather supplies: incense sticks with lighter or thin candle, facial tissue strips or lightweight ribbon, flashlight, painter’s tape for marking spots, notepad or phone for detailed notes, and optionally a damp cloth or infrared thermometer. Work systematically room by room, starting with the windward side of the house. Ensure good ventilation afterward if using smoke. Have a helper observe from different angles when possible.
Step 1: Comprehensive Visual Inspection Inside and Out
Conduct exterior inspection first in bright daylight to spot obvious issues. Examine caulk lines around the frame for cracks, shrinkage, gaps wider than 1/16 inch, or complete detachment from siding or brick. Check wooden sills and frames for rot, softness, warping, or discoloration indicating past water entry. Inspect weatherstripping on operable sashes for hardening, flattening, tearing, or pulling away from surfaces. Look for peeling paint or stained trim suggesting moisture problems. Inside, observe for dust buildup or dirt streaks near edges where air currents deposit particles. Note any daylight visible around closed windows or curtains moving slightly without breeze.
Detailed Exterior Visual Checks
Stand back to view the entire window unit for frame misalignment or bowing. Feel sills gently for sponginess or crumbling wood. Verify drip caps slope outward and flashing appears intact without rust or separation. Check for insect entry signs near gaps as pests exploit drafts.
Key Interior Visual Indicators
Look closely at lock mechanisms for looseness or misalignment that prevents tight closure. Observe condensation patterns on glass or sills from past humidity infiltration. Check for bubbling or peeling interior paint near frames.
Step 2: The Reliable Hand-Feel Method for Air Movement
- On a suitably cold or windy day, slowly pass your bare hand along every edge of the closed window:
- top sash rail, bottom sill, side jambs, corners, lock area, and hinge points if applicable.
- Feel carefully for sudden cold currents, gentle breezes, or temperature drops indicating active infiltration.
- Test at multiple heights since leaks often occur higher or lower along the frame.
- Pay extra attention to operable sash meeting points and where hardware penetrates the frame.
Optimal Conditions for Hand Testing Sensitivity
Maximum contrast between indoor warmth and outdoor cold enhances detection. Wind increases pressure driving air through gaps. Repeat the test several times moving slowly to catch intermittent or weak flows.
What Different Sensations Mean
Strong, steady cold flow points to large openings needing immediate sealing. Weak or spotty movement suggests smaller gaps or partially failed weatherstripping. Consistent warmth across the entire perimeter generally indicates good sealing at that moment.
Step 3: Incense Smoke or Candle Flame Precision Test
Light a thin incense stick or narrow candle and hold it 1–2 inches from window edges while moving slowly along all perimeters. Observe smoke trail or flame behavior meticulously: sharp bending, sudden swirling, being pulled inward, or extinguishing signals clear air entry. Test systematically from top to bottom and side to side on both operable and fixed sections. Perform with no indoor fans or HVAC airflow interfering.
Safety and Technique Tips for Flame/Smoke Use
Maintain safe distance from curtains, fabrics, or flammable surfaces. Use long incense for better smoke visibility and control. Extinguish immediately after testing each area. Have water or extinguisher ready as backup precaution.
Interpreting and Documenting Results
Strong smoke deflection confirms high-priority leak spots. Mark locations precisely with painter’s tape. Photograph marked areas for repair planning reference.
Step 4: Tissue Paper or Ribbon Visual Draft Indicator
Cut thin strips of facial tissue, toilet paper, or lightweight ribbon about 6–8 inches long. Hold one end near suspected gaps with the window closed. Watch for fluttering, suction toward the gap, or outward blowing indicating air movement direction. This method excels at pinpointing small leaks around locks, hinges, sash edges, and corners. Use on windy days for amplified results.
Benefits of This Non-Flame Method
Completely safe with no fire risk. Uses inexpensive household items instantly. Provides clear visual proof of even subtle air currents.
Enhancing Accuracy with Multiple Strips
Test several locations simultaneously for comparison. Combine with hand-feel for confirmation of borderline areas.
Step 5: Daylight Perimeter Leak Visibility Check
Darken the room completely by closing curtains or blinds during bright daylight hours. Stand inside and observe all window edges carefully from various angles. Look for thin rays of light, glowing outlines, or visible gaps around the frame perimeter. Significant light leakage confirms substantial air pathways despite the window appearing closed.
Maximizing This Test’s Effectiveness
Use direct sunlight for strongest contrast. View from low angles to catch subtle light seepage. This method detects larger structural gaps particularly well.
Limitations and Best Complementary Pairings
May miss microscopic leaks; pair with smoke or tissue tests for complete coverage.
Step 6: Controlled Water Test for Moisture-Related Draft Paths
During rain or with a gentle garden hose spray, wet exterior window perimeters methodically while observing inside for drips, running water, damp sills, or new stains. This identifies combined air and water entry points. Note exact locations where moisture appears indoors quickly.
Safe Execution of Water Testing
Use low pressure to prevent forcing water through intact areas. Have an interior observer watching closely. Dry all tested surfaces immediately afterward with towels and fans.
Linking Water Findings to Draft Diagnosis
Immediate interior drips indicate direct pathways. Delayed dampness suggests capillary wicking through small cracks.
Step 7: Additional Advanced At-Home Confirmation Techniques
Use a damp hand slowly along edges for enhanced cold sensation detection. Employ an inexpensive infrared thermometer to scan for cold spots near frames. Perform a shake test by gently rattling closed sashes to check for looseness indicating poor compression. These methods add layers of verification.
When Multiple Tests Agree on Locations
Consistent positive results across hand, smoke, tissue, and daylight tests signal major leaks needing prompt permanent repairs.
Documenting Everything Thoroughly
Record specific locations, test types, severity notes, and photos for each window. This information guides repair prioritization and tracks progress.
Overview of Draft Diagnosis Steps and Tools Table
| Step | Diagnostic Method | Required Tools/Materials | Ideal Testing Conditions | Primary Detection Focus | Ease Level |
| 1 | Visual Inspection | Flashlight, daylight | Bright natural light | Cracks, rot, gaps, fogging | Easy |
| 2 | Hand-Feel Test | Bare hands | Cold/windy day, 20–30°F difference | Moving air currents | Easy |
| 3 | Incense/Candle Smoke Test | Incense stick or thin candle | Windy day, no fans | Air direction & strength | Medium |
| 4 | Tissue/Ribbon Test | Tissue strips or ribbon | Windy day | Small pinpoint leaks | Easy |
| 5 | Daylight Gap Check | Darkened room | Bright sunny day | Visible light seepage | Easy |
| 6 | Water Spray Test | Hose or rain event | Rainy day or controlled spray | Water entry pathways | Medium |
| 7 | Supplementary Checks | Damp hand, IR thermometer, shake test | Varies | Cold spots, looseness | Easy-Medium |
Prioritizing Repairs Based on Diagnosis Findings
Address perimeter caulk and weatherstripping first for most common leaks. Tackle sash alignment or hardware issues next. Reserve IGU replacement for confirmed fogging cases. Temporary fixes like foam tape or rope caulk provide immediate relief while planning permanent solutions.
Common Mistakes to Avoid During Diagnosis
Avoid testing on calm, mild days when leaks appear minimal. Do not rely on a single method alone. Skip open-flame tests near flammable materials. Never ignore weak but consistent findings across tests.
Professional Help Indicators After Diagnosis
Seek experts for widespread issues, suspected rot, multiple failed IGUs, or if DIY attempts fail to eliminate drafts. Professionals employ blower-door tests, infrared imaging, and pressure mapping for comprehensive analysis.
Conclusion – Accurate Diagnosis Leads to Effective, Cost-Saving Fixes
Diagnosing drafty windows systematically empowers homeowners to target repairs precisely and avoid wasting resources on unnecessary work. Combining visual checks, hand-feel, smoke/tissue tests, daylight observation, and water confirmation ensures no significant leaks go undetected. Early identification prevents energy waste, improves comfort dramatically, reduces utility bills noticeably, and extends window lifespan through timely intervention.
Most homeowners complete thorough diagnosis in under an hour per room using basic household items. The effort pays off quickly through lower heating and cooling demands and fewer cold spots or hot zones. Regular seasonal checks catch developing issues before they worsen significantly.
FAQs:
Which single test gives the fastest confirmation of a drafty window?
The hand-feel test along edges on a cold or windy day detects moving air immediately without any tools. It takes seconds per section and highlights obvious leaks instantly. Follow up with tissue or smoke for visual proof.
Why is the incense smoke test considered one of the most reliable DIY methods?
Smoke traces air currents precisely, showing both direction and intensity of leaks clearly. Even subtle gaps deflect or pull smoke noticeably. Conduct on windy days with no indoor airflow for maximum accuracy.
Can a window feel draft-free during calm weather but still leak significantly?
Yes—pressure differences drive leaks; calm days minimize them. Always test during wind or strong temperature contrast to reveal true extent of air infiltration.
How do I differentiate between sash leaks and frame perimeter leaks?
Smoke or tissue tests on sash meeting rails versus fixed frame caulk lines distinguish sources. Sash leaks change with operation; perimeter leaks remain constant.
Is visible daylight around a closed window a definite sign of serious drafts?
Significant light leakage indicates large gaps allowing substantial air exchange. Smaller drafts may not show light but still cause measurable energy loss.
Should I perform draft tests in every season or only winter?
Winter or windy conditions reveal leaks best due to pressure contrasts. Summer tests catch heat gain issues. Annual checks in varying weather provide complete picture.
What does fogging between double panes indicate during diagnosis?
Fogging confirms failed insulated glass seals, causing gas loss and reduced insulation. This often accompanies perimeter drafts and requires IGU replacement.
Can I safely combine smoke and tissue tests on the same window?
Yes—use tissue first for safety, then smoke for confirmation. Avoid flame near tissue or curtains. Multiple methods increase diagnostic confidence significantly.
How accurate are these DIY methods compared to professional equipment?
DIY tests detect most practical leaks reliably for homeowners. Professionals use infrared cameras and blower doors for hidden or whole-house quantification when needed.
What immediate temporary action helps after finding strong drafts?
Apply self-adhesive foam tape or rope caulk along identified gaps for quick reduction in air exchange. This provides temporary relief until permanent repairs occur.


