

Patio doors enhance home aesthetics and functionality by connecting indoor living spaces with outdoor areas seamlessly. The seals around these doors play a critical role in maintaining energy efficiency, blocking drafts, preventing water intrusion, and reducing outside noise. Over time, seals degrade due to weather exposure, mechanical stress, improper installation, or lack of maintenance, leading to noticeable problems. Common symptoms include persistent drafts, visible gaps, condensation on interior surfaces, difficulty sliding the door smoothly, increased utility bills, and even pest entry points.
Ignoring seal issues allows small leaks to escalate into major water damage, mold growth, warped frames, or complete seal failure requiring expensive replacements. Timely identification and repair restore performance while extending the door’s overall lifespan significantly. Proper fixes range from simple DIY cleaning and lubrication to professional resealing or full weatherstrip replacement. Homeowners in Woodbridge VA often address these concerns to combat seasonal humidity changes and maintain comfortable indoor environments year-round.

Common Signs of Patio Door Seal Failure
Recognizing early warning signs prevents costly escalation and preserves home comfort effectively. Drafts felt near the door edges during windy days indicate compromised seals immediately. Visible gaps between the door frame and panel allow air infiltration constantly. Condensation or fogging along interior glass edges signals moisture penetration through failed seals. Increased energy bills without other explanations frequently trace back to leaking patio doors. Unusual noise levels from outside become more pronounced when seals wear thin. Door operation feels sticky or requires extra force due to misaligned or deteriorated seals pressing unevenly.
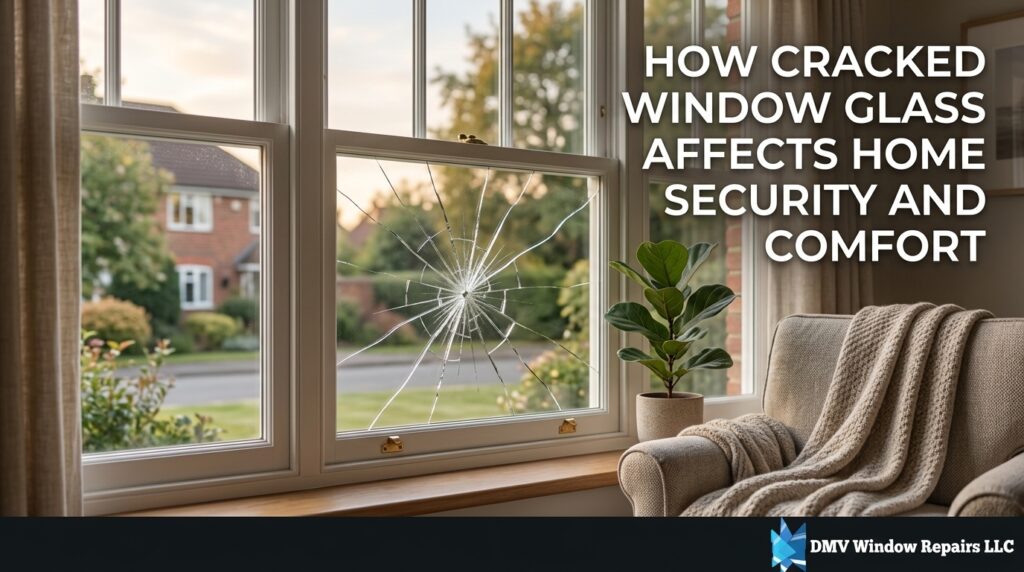
Visible Damage Indicators
Cracked, peeling, or crumbling weatherstripping appears brittle and discolored over years of exposure. Compressed or flattened seals lose their ability to rebound and fill gaps properly. Tears or missing sections create obvious openings along the perimeter. Discoloration from UV damage weakens material integrity noticeably. Mold or mildew growth near seal areas confirms chronic moisture intrusion. These visual cues demand prompt attention before further deterioration occurs.
Performance-Related Symptoms
Persistent cold spots near the door during winter months highlight heat loss through poor seals. Summer heat gain makes rooms uncomfortably warm despite air conditioning running. Water stains or puddles on interior floors after rain point to seal leaks directly. Sliding resistance increases as seals drag against the frame or track. Humming or whistling sounds during wind indicate air escaping through compromised areas. These functional problems confirm seal failure beyond cosmetic appearance.
Primary Causes of Seal Problems
Environmental factors accelerate seal degradation more than any other influence combined. Ultraviolet radiation from direct sunlight breaks down rubber and vinyl compounds over time. Extreme temperature fluctuations cause expansion and contraction stressing seal materials repeatedly. Moisture and humidity promote mold while softening certain seal types permanently. Physical wear from frequent door use compresses seals unevenly eventually. Poor initial installation leaves seals misaligned or overstretched from the beginning. Settling foundations or frame warping create uneven pressure points accelerating failure.
Weather and Environmental Factors
Prolonged sun exposure fades and cracks seals making them brittle and ineffective. Freeze-thaw cycles in colder months crack seals that become rigid when cold. Heavy rain and wind drive water past deteriorated seals into frames. High humidity levels prevent seals from maintaining tight compression. Airborne pollutants and dirt accumulate in seal grooves accelerating breakdown. These natural elements compound over seasons creating cumulative damage.
Mechanical and Installation Issues
Frequent heavy usage wears down seals through constant friction and compression. Improperly sized or low-quality replacement seals fail prematurely under normal conditions. Frame misalignment from house settling pinches seals in certain areas. Roller or track problems force the door to bind against seals abnormally. Incorrect installation techniques stretch or bunch seals unevenly from day one. These mechanical factors often combine with environmental stress for faster deterioration.
Tools and Materials Needed for Seal Repairs
Gathering appropriate supplies ensures efficient and long-lasting repairs without repeated trips to the store. Basic hand tools handle most seal removal and installation tasks effectively. Quality replacement weatherstripping matches original performance characteristics closely. Cleaning agents prepare surfaces for maximum adhesion and longevity. Measuring tools guarantee precise cuts avoiding gaps or overlaps. Adhesives and sealants provide secure bonding in critical areas.
Essential Hand Tools
Utility knives with fresh blades cut old seals cleanly without damaging frames. Flathead and Phillips screwdrivers remove trim pieces or hardware as needed. Putty knives pry out stubborn adhesive residues safely. Measuring tape and straightedge ensure accurate sizing of new strips. Pliers help extract embedded staples or nails from older installations. Scissors trim foam or vinyl seals precisely along edges.
Recommended Materials
High-quality EPDM or silicone weatherstripping resists UV and temperature extremes best. Butyl rubber tape provides excellent adhesion for permanent seals. Silicone-based caulk seals gaps around frames watertight. Isopropyl alcohol cleans surfaces removing oils and old residue. Adhesive promoter enhances bonding on difficult surfaces like vinyl. Backer rod fills larger gaps before caulking for better performance.
Step-by-Step DIY Seal Repair Guide
- Following structured steps delivers professional-quality results with patience and care.
- Preparation prevents common mistakes that shorten repair lifespan.
- Careful removal preserves surrounding materials intact.
- Precise measurement ensures proper fit without stretching or bunching.
- Thorough cleaning maximizes new seal adhesion dramatically.
- Testing operation confirms smooth function after completion.
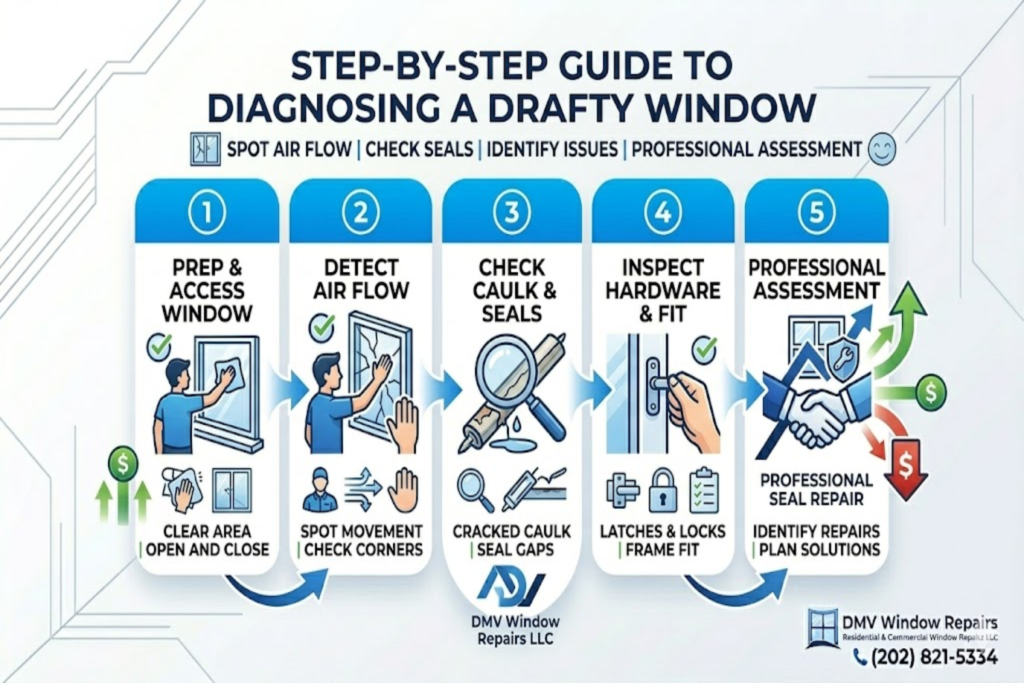
Step 1: Inspection and Preparation
Examine entire perimeter identifying all damaged or missing sections thoroughly. Clean door and frame removing dirt, old adhesive, and debris completely. Measure each section requiring replacement accurately multiple times. Purchase slightly extra material accounting for errors or waste. Gather all tools and work in moderate weather conditions ideally. Protect surrounding floors with drop cloths during work.
Step 2: Removing Old Seals
Score along edges with utility knife loosening adhesive bonds carefully. Peel or pry old weatherstripping away starting from one corner progressively. Remove stubborn sections using putty knife or heat gun cautiously. Clean residual glue with appropriate solvent until surface feels smooth. Vacuum debris preventing interference with new installation. Inspect exposed areas for frame damage or rot needing repair first.
Step 3: Surface Preparation
Wipe all contact surfaces with isopropyl alcohol removing oils and contaminants. Sand lightly if necessary creating better texture for adhesion. Apply adhesive promoter where recommended by manufacturer instructions. Allow surfaces to dry completely before proceeding further. Ensure frame remains straight and undamaged at this stage. Proper preparation dramatically improves seal longevity.
Step 4: Installing New Seals
Cut replacement strips to exact measured lengths using straightedge guide. Peel backing from adhesive-backed weatherstripping carefully. Press firmly into place starting from one end avoiding bubbles or twists. Use roller tool ensuring even compression along entire length. Apply caulk to corners or joints for extra weatherproofing. Trim excess material flush for clean professional appearance.
Step 5: Testing and Final Adjustments
Rehang door if removed and test sliding action multiple times smoothly. Check for gaps using dollar bill test along perimeter edges. Adjust rollers if door binds against new seals noticeably. Apply light lubrication to tracks improving overall operation. Monitor performance during next rain or windy day. Make minor tweaks ensuring complete seal integrity.
Professional Seal Repair Services
Certified technicians bring specialized tools and materials unavailable to most homeowners. They diagnose underlying frame or alignment issues contributing to seal failure. Professional-grade weatherstripping often lasts longer than retail options. Warranties cover both labor and materials providing long-term assurance. Emergency services address sudden leaks preventing water damage quickly. In Woodbridge VA, experienced contractors handle these repairs efficiently for consistent results.
Types of Weatherstripping for Patio Doors
Various materials suit different door designs and climate conditions effectively. Vinyl offers affordability and easy installation for basic needs. EPDM rubber provides superior durability against UV and temperature extremes. Silicone remains flexible in cold weather maintaining seal compression. Foam tapes compress easily filling irregular gaps temporarily. Brush-type sweeps block insects while allowing smooth door movement.
Compression vs Adhesive-Backed Options
Compression seals rely on door pressure creating tight seal naturally. Adhesive-backed versions stick permanently requiring clean surfaces for bonding. Compression types allow easier future replacement when worn. Adhesive options provide cleaner appearance without visible fasteners. Both types work well depending on door configuration specifically. Combining styles often yields best overall performance.
Brush and Magnetic Seal Alternatives
Brush seals sweep debris while blocking light and air effectively. Magnetic strips create strong closure along vertical edges securely. These alternatives suit sliding doors particularly well. Brush types require periodic cleaning to maintain efficiency. Magnetic versions resist wind pressure better in exposed locations. Hybrid systems combine multiple types for comprehensive protection.
Cost Analysis of Seal Repairs
Expenses vary based on material quality, door size, damage extent, and service choice. Basic DIY weatherstripping stays affordable for most homeowners. Professional replacement includes labor ensuring proper installation. Hidden frame repairs increase totals unexpectedly sometimes. Quality materials justify higher upfront cost through extended service life. Comparing options prevents overspending while achieving durable results.
| Repair Type | Materials Needed | Average DIY Cost | Average Professional Cost | Typical Time Required | Expected Lifespan |
| Basic Vinyl Weatherstrip Replacement | Vinyl strips, adhesive, cleaner | $25–$60 | $150–$300 | 1–2 hours | 3–5 years |
| EPDM Rubber Seal Upgrade | EPDM strips, caulk, tools | $40–$90 | $200–$400 | 2–3 hours | 7–10 years |
| Silicone Compression Seal Install | Silicone tubes, backer rod | $50–$110 | $250–$450 | 2–4 hours | 8–12 years |
| Full Perimeter Resealing | Multiple materials, sealant | $80–$150 | $350–$700 | 4–6 hours | 10+ years |
| Brush Sweep Bottom Replacement | Brush sweep, screws | $30–$70 | $120–$250 | 1–2 hours | 5–8 years |
| Magnetic Seal Addition | Magnetic strips, adhesive | $45–$100 | $180–$350 | 1–3 hours | 6–9 years |
| Frame Caulking & Gap Filling | Caulk, backer rod, tools | $20–$50 | $100–$250 | 1–3 hours | Varies |
| Complete Door System Tune-Up | Seals, rollers, lubrication | $100–$200 | $400–$800 | 4–8 hours | Comprehensive |
Additional Cost Considerations
Unexpected frame repairs or custom-cut materials raise totals beyond initial estimates. Premium materials cost more upfront but reduce replacement frequency noticeably. Labor rates vary by region and technician experience significantly. Emergency service calls add surcharges for immediate response. Bundling seal work with other door maintenance often secures discounts. Budgeting extra percentage covers unforeseen complications comfortably.
Prevention Strategies for Long Seal Life
Regular maintenance extends seal performance dramatically over years. Monthly cleaning removes dirt preventing premature wear effectively. Annual inspection catches early cracking or compression loss quickly. Gentle door operation avoids unnecessary stress on seals constantly. Proper roller adjustment prevents binding against seals abnormally. Applying protectant periodically shields materials from UV damage. These habits minimize repair frequency substantially.
Seasonal Maintenance Checklist
Spring cleaning clears winter debris from tracks and seals thoroughly. Summer UV protectant application preserves flexibility during peak sun exposure. Fall lubrication keeps rollers moving smoothly reducing seal strain. Winter checks ensure no ice buildup damages compression seals. Consistent seasonal care prevents most common failures proactively. Simple routines deliver major protection long-term.
Conclusion
Patio door seal problems compromise comfort, energy efficiency, and home integrity when left unaddressed over time. Understanding causes like weather exposure, mechanical wear, and installation errors enables targeted prevention strategies. DIY repairs restore function affordably for minor issues while professionals handle complex cases reliably.
Investing in quality materials and regular maintenance extends seal life significantly. Proactive care avoids water damage, mold risks, and escalating repair costs effectively. With proper attention, patio doors maintain smooth, weather-tight performance for decades. In Woodbridge VA, consistent seal maintenance ensures reliable protection against variable seasonal conditions.
Frequently Asked Questions
- How do I know if my patio door seals need replacement?
Feel for drafts around edges on windy days or notice higher energy bills unexplained otherwise. Visible cracks, gaps, or peeling indicate immediate replacement needed. Condensation between glass panes or on frames confirms seal failure. Test by closing door on dollar bill—if pulls out easily, seals no longer seal tightly.
- Can I fix patio door seals myself or should I hire a professional?
Minor compression seal or weatherstrip replacement works well as DIY with basic tools. Complex frame damage, full perimeter resealing, or alignment issues benefit from professional expertise. DIY saves money on simple jobs while professionals guarantee proper fit and longevity. Assess your skill level and problem complexity before deciding.
- What is the best material for patio door weatherstripping?
EPDM rubber offers excellent durability against UV, temperature extremes, and compression set. Silicone maintains flexibility in cold weather while resisting cracking. Vinyl provides affordable easy installation for moderate climates. Choose based on local weather and door exposure for optimal performance.
- Why do my patio door seals keep failing repeatedly?
Underlying frame misalignment or roller problems cause uneven pressure wearing seals prematurely. Low-quality replacement materials degrade faster under same conditions. Lack of regular cleaning allows dirt to abrade seals constantly. Addressing root causes like alignment prevents recurring failures effectively.
- How much does professional patio door seal replacement cost typically?
Basic weatherstrip replacement ranges from $150 to $400 depending on door size. Full perimeter resealing with premium materials costs $350 to $700 usually. Additional frame repairs increase totals noticeably. Multiple quotes help secure fair pricing in your area.
- Will new seals improve my home’s energy efficiency noticeably?
Yes, properly installed tight seals reduce air infiltration dramatically lowering heating and cooling costs. Eliminating drafts near doors creates more consistent indoor temperatures. ENERGY STAR-rated seals enhance overall performance further. Most homeowners notice improvement in comfort and bills quickly.
- How often should I inspect and maintain patio door seals?
Visual checks every three months catch early wear before failure occurs. Deep cleaning and lubrication twice yearly prevents dirt buildup. Apply protectant annually shielding from UV damage. Immediate attention to any visible changes extends seal life significantly.
- Can seals prevent water leaks during heavy rain?
High-quality compression and caulked seals block water intrusion when installed correctly. Bottom sweeps divert rain away from thresholds effectively. Regular maintenance ensures seals maintain tight contact preventing leaks. Combining multiple seal types provides best water resistance.
- What causes condensation on the inside of my patio door?
Failed seals allow humid outdoor air to contact cold interior glass surfaces. Poor insulation creates temperature difference promoting condensation. Replacing seals and improving ventilation reduces interior moisture effectively. Addressing seals stops condensation at its source usually.
- Are there temporary fixes for leaking patio door seals?
Apply silicone caulk to gaps as short-term weatherproofing measure. Use foam tape filling small areas until permanent replacement possible. Clean and lubricate tracks improving closure temporarily. These stopgaps buy time but full replacement delivers lasting solution. In Woodbridge VA, addressing seals promptly prevents moisture issues common during humid seasons.
Visit our DMV Window Repairs LLC blog to explore our residential and commercial glass services for customers in Woodbridge, VA.

